
Why you should learn Python Selenium?
I like the banner indicated on selenium mainpage where it says boring web-based administration tasks can (and should) also be automated as well. I strongly agree with that statement. These boring web-based administration tasks does not bring any value but needs to be done nonetheless. So why not just automate it away?
This article is written for people who wish to do some automation with the browser and are familiar with the basics of Python.
Selenium is a Python library that helps you automate stuff on the browser such as sending data to an input form, clicking buttons.
In the roles I've worked in, I am fortunate to have access to the database directly, be it with write access or read access. This makes getting data so much easier with SQL query.
However, that's not the case for most people, especially non technical roles. They are usually given a login ID and password to access a web application, to retrieve data from a site. It could be clicking some buttons on the site to download some reports. This is where Selenium is very good at.
Installing Selenium
To start off, we need to install selenium as it doesn't come pre-installed.
To install selenium, spin up your terminal and pip install selenium.
Downloading Chromedriver
Next, we need to download compatible version of Chromedriver. I am using Google Chrome for my browser. Before we download the chromedriver, we need to know the existing version of our browser. To check the existing version of your Google Chrome Browser, you can navigate to chrome://settings/help on your browser, you should be able to see the version. Mine is 123.0.6312.123(Official Build) (64-bit) at point of writing this article. Yours could be a different version and that's fine.
Next, you can navigate to chromedriver download page to find the version that you are in.
Once downloaded, it should be in your downloads folder by default.
Understanding the DOM (Document Object Model)
We need to understand the DOM to start automating. You can read the following link if you want to understand more. When a user visit a particular URL, the browser (also known as client) will send a request to the server, and request for a webpage. Once the browser receives the necessary files, it will then assembles them into a complete web page and display it to you. For more in depth explanation, you can read the following article.
Inspecting the DOM
To know which element to click on, or to send data, we use the tools given by the Chrome Browser to inspect them.
To inspect the web page, you can right click using your mouse on the page, scroll down and you should see "inspect". Once you clicked inspect, you will see a pop up that looks like this. This is more commonly known as the Developer Tools, or DevTools in short.

For the purpose of demonstration, we will inspect the page of our local telco Starhub.
By default, you should be on the "elements" tab which is the tab we will use to navigate. We will try to login the page with our Hub ID and password. If you do not have a Starhub account, ask your friend to lend you their credentials for learning purpose.
For any text / buttons on the page, I will refer to them as "elements", a common term to describe stuff like buttons / text / input box etc on the page.
To login my account, here are the steps I need to do:
- Click on My Account on the top right corner
- Click on the Hub ID Login from the My Account navigation pops up.
- Send my Hub ID and password to the login pop up and click on the Login button.
Retrieving the DOM elements
In order to get the element you want, move your cursor over the element, right click and inspect. Once you inspect, you can see on the Developer Tools, that particular element is highlighted.
You can hover you mouse over the different elements and Chrome will highlight them accordingly.
For My Account element, you can see <span>My Account</span> in the browser.
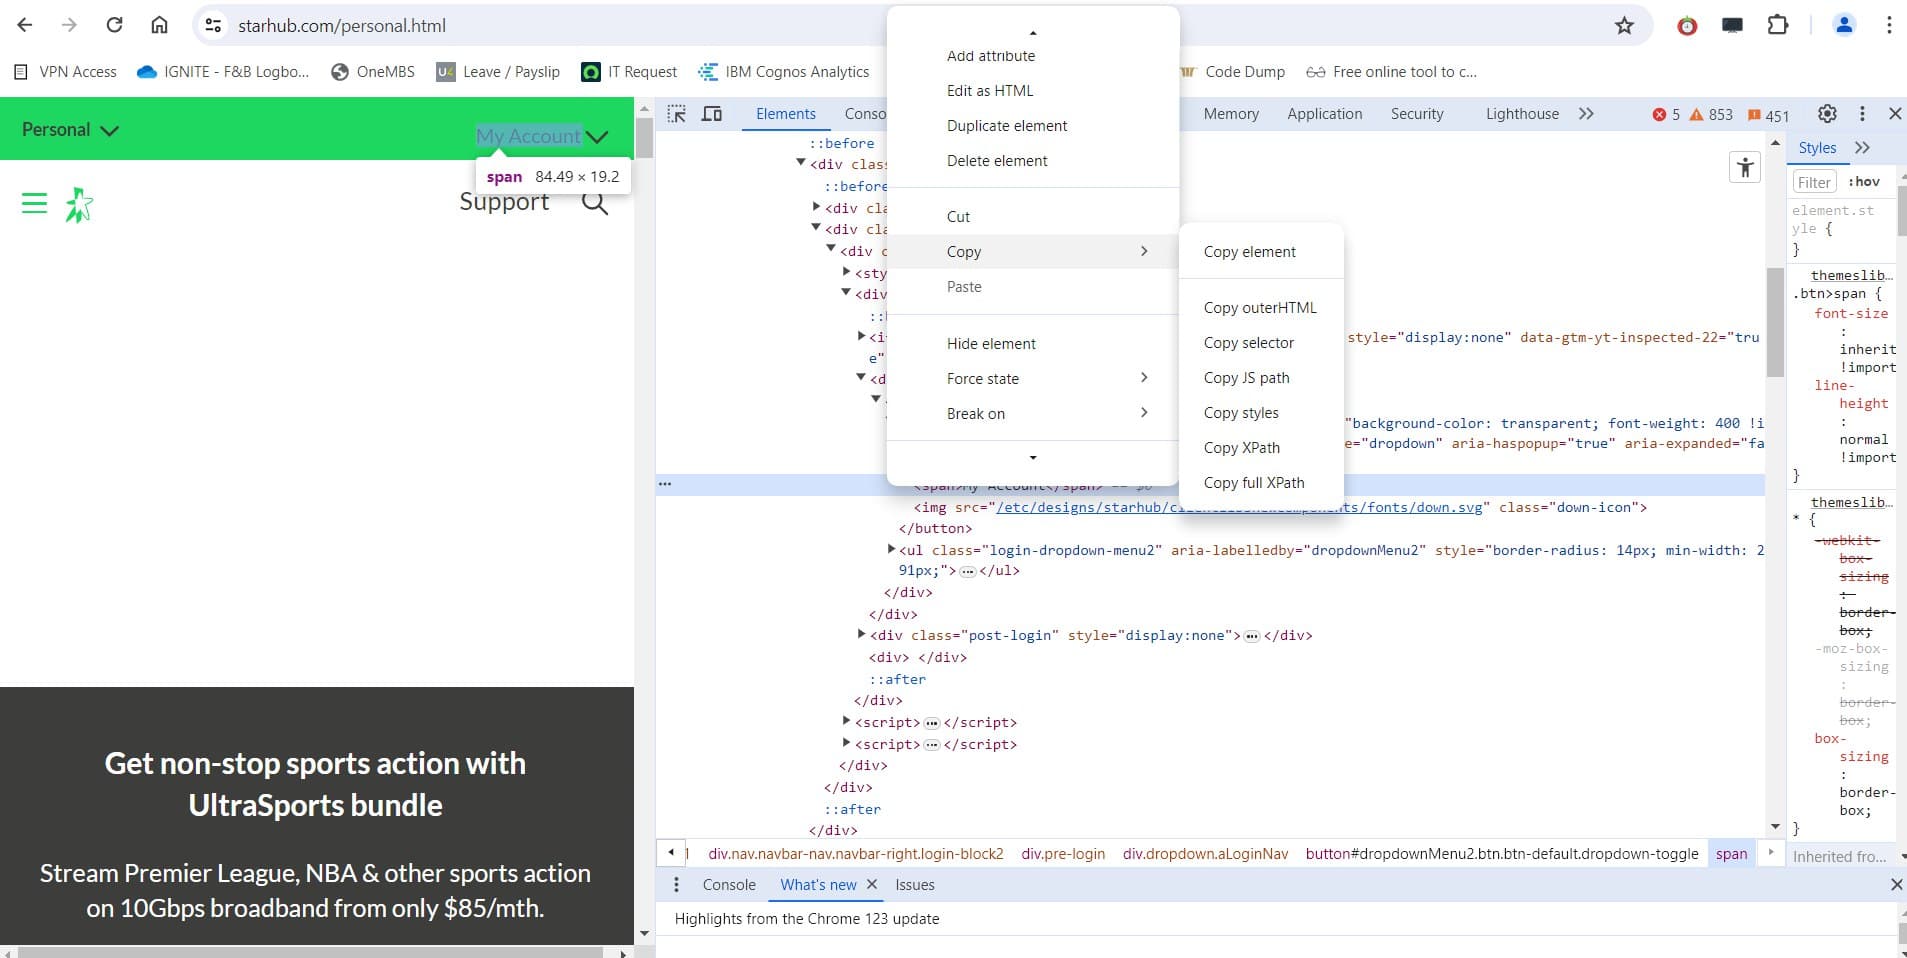
Next, we place our cursor over that element, right click, scroll to "Copy", there's a list of option to choose from.
Click on "Copy Xpath". Save that somewhere. You should be getting //*[@id="dropdownMenu2"]/span.
Xpath is a path on the DOM tree that uniquely identify the element on the page. In most cases, Xpath will be sufficient to uniquely identify, however some web pages might need to copy the full xpath instead. Usually I will use the xpath first, if I encounter any error, then I might switch to use the full xpath instead.
Next, we click on My Account to show the popup, right click on the Hub ID Login and copy xpath. I will save it as a variable.
hub_id_login_xpath = '//*[@id="btnLogin"]'
Next, we click on the Hub ID Login and another popup will show the form to get your Hub ID, Password, and login button. Do the same for all three to grab their xpath.
hub_id_input_xpath = '//*[@id="form_fake_uid"]'
password_xpath = '//*[@id="inputpassword"]'
login_btn_xpath = '//*[@id="submit"]'
We now have all the elements we need to start coding.
Common workflow for browser automation
Importing libraries
We start by importing the necessary.
from selenium import webdriver
from selenium.webdriver.chrome.options import Options
from selenium.webdriver.chrome.service import Service
from selenium.webdriver.common.by import By
from selenium.webdriver.support.ui import WebDriverWait
from selenium.webdriver.support import expected_conditions as EC
import time
import datetime
import os
Next, I create username and password variables to store my credentials. Do note this is not the best practice. You can explore using python-dotenv which is usually recommended.
username = 'yourownusername'
password = 'yourownpassword'
Initializing driver
Typically we declare a variable named driver to point it to the chromedriver we downloaded, assuming it's inside your Downloads folder.
driver = webdriver.Chrome(service=Service(os.path.expanduser("~/Downloads/chromedriver.exe")))
Navigating to target URL
To navigate to the website, we use the get method on the driver.
driver.get("https://www.starhub.com/personal.html")
Maximizing browser window
You can also maximize the browser to fit the entire window.
driver.maximize_window()
Although it's not necessary, but it can be useful when you need alternatives when you have difficulties automating with selenium. These are pretty rare but I do encounter them. Instead, I use a library called pyautogui to navigate the coordinates of the web application to perform clicks etc.
Loading a new page
Whenever we load a new page, it's recommended to wait for the element to appear before you start to navigate to click it. To wait for an element, we do the following:
my_account_xpath = '//*[@id="dropdownMenu2"]/span'
WebDriverWait(driver, 20).until(EC.element_to_be_clickable((By.XPATH, my_account_xpath)))
In the above, we specify my_account_xpath variable to store the xpath we grab using the devtools earlier.
Thereafter we wait 20 secs for the element to be clickable. The reason for doing this is to ensure we can click on the element before we proceed to click it. Sometimes, the chromedriver is too fast and the browser takes a while to assemble the elements or the server take a while to transmit the elements to the client. If you don't wait for the element to be clickable, the code may result in an error.
The 20 secs here does not mean that it wait for 20 secs but rather it will start to fail if the browser does not detect the element within 20 secs. As soon as it detect the element, it will continue to run the next line of code.
Clicking element
Next we specify the following to click on the element.
driver.find_element(By.XPATH, my_account_xpath).click()
We do the same for the hub id login.
hub_id_login_xpath = '//*[@id="btnLogin"]'
WebDriverWait(driver, 20).until(EC.element_to_be_clickable((By.XPATH, hub_id_login_xpath)))
driver.find_element(By.XPATH, hub_id_login_xpath).click()
Next, we do the same for the popup to send the username and password, and click on the login button. To send data, we use the send_keys method.
username_xpath = '//*[@id="form_fake_uid"]'
password_xpath = '//*[@id="inputpassword"]'
login_btn_xpath = '//*[@id="submit"]'
WebDriverWait(driver, 20).until(EC.element_to_be_clickable((By.XPATH, username_xpath)))
driver.find_element(By.XPATH, username_xpath).send_keys(username)
driver.find_element(By.XPATH, password_xpath).send_keys(password)
driver.find_element(By.XPATH, login_btn_xpath).click()
You will realized that the code run into a TimeoutException. This happens because it waited for 20 secs but the username_xpath is not clickable. But we specify this in our code isn't it? Let's find out why.
Debugging
Debugging is a term to find out why certain things don't work or why is there an error. Open up the developer tools. Navigate again to the popup and inspect the element.
If you scroll up, you can see this element called iframe.
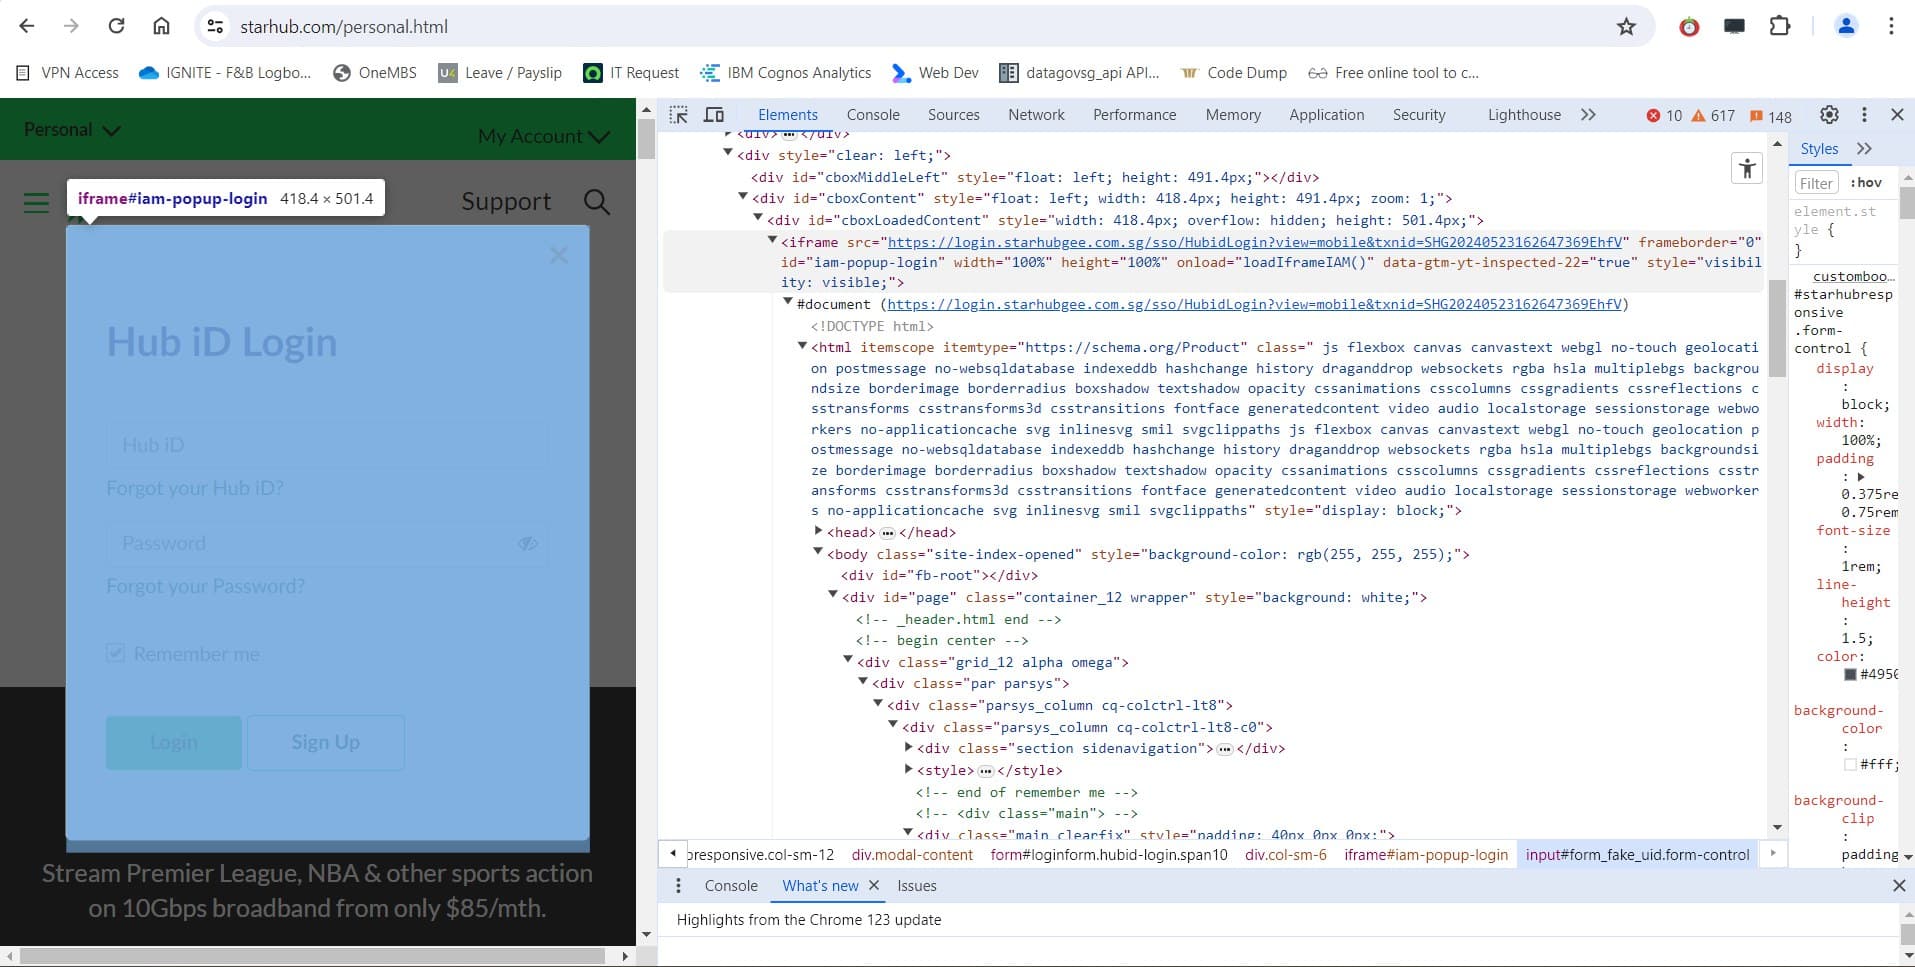
According to MDN Web documents, an iframe HTML element represents a nested browsing context, embedding another HTML page into the current one.
Switching iframe
For elements inside an iframe, you will need to switch to the iframe, before you can find the element and click on it.
Examine the iframe element and copy the xpath.
hub_id_iframe_xpath = '//*[@id="iam-popup-login"]'
To switch to the iframe:
hub_id_iframe_xpath = '//*[@id="iam-popup-login"]'
WebDriverWait(driver, 20).until(EC.element_to_be_clickable((By.XPATH, hub_id_iframe_xpath)))
hub_id_iframe = driver.find_element(By.XPATH, hub_id_iframe_xpath)
driver.switch_to.frame(hub_id_iframe)
Next, we re-execute the code where it fail earlier due to not switching the iframe first.
username_xpath = '//*[@id="form_fake_uid"]'
password_xpath = '//*[@id="inputpassword"]'
login_btn_xpath = '//*[@id="submit"]'
WebDriverWait(driver, 20).until(EC.element_to_be_clickable((By.XPATH, username_xpath)))
driver.find_element(By.XPATH, username_xpath).send_keys(username)
driver.find_element(By.XPATH, password_xpath).send_keys(password)
driver.find_element(By.XPATH, login_btn_xpath).click()
To switch back to the default content:
driver.switch_to.default_content()
Unfortunately, the site requires OTP to continue, so I couldn't continue to perform further task unless I manually key in the OTP or fetch that OTP inside my email using other modules / libraries but that would be beyond the scope of this article.
I chose this site as an example because it has an iframe. However, not all sites contain iframe.
Conclusion
In this article, we learned about:
- How to use selenium to automate web application
- How to download Chromedriver
- Using Chrome Developer tools to inspect element
- Retrieving DOM elements xpath using chrome devtools
- Common workflow for browser automation
- Switching iframe when the site uses one
Start putting these skills to automate these boring web-based administrative tasks. If you like to share any tips to improve or have any questions, feel free to reach out to me via LinkedIn or email here.
The entire code are also hosted on github. I've refactored the code to using functions. Feel free to check it out.